长话短说
最近在一个屎山项目中居然碰到了一个 git 分支切换失败的问题,当从 master 切换到 main 时,报错了。由于报错信息非常模糊,导致使用 AI 工具,也被绕来绕去,始终没能解决。
最后通过搜索引擎,找到了一个 GitHub Issues 上的讨论,了解到原来是和 git lfs 的身份认证失败有关,最终对症下药,将问题解决:在 Windows 上,由于对 ssh 私钥的权限太过开放,导致在向 ssh 服务器进行身份认证的过程中报错了,通过去除了 everyone 对私钥的访问权限,问题立即得以解决。
问题
在 git checkout main 时,得到如下错误:
python ➜ git checkout origin/main Updating files: 100% (7998/7998), done. Downloading AutoTools/phantomjs.exe (7.0 MB) Error downloading object: AutoTools/phantomjs.exe (f07aa8b): Smudge error: Error downloading AutoTools/phantomjs.exe (f07aa8b7a2d6480b1950f39b18f1548077bb1dae0ff7d02cb670daa2fa7cf445): batch response: Repository or object not found: 🔗 https://blog.appharbor.com Check that it exists and that you have proper access to it
Errors logged to C:UsersJeffzizhujy.gitlfslogs20240604T231702.2230608.log. Use git lfs logs last to view the log. error: external filter git-lfs filter-process failed fatal: AutoTools/phantomjs.exe: smudge filter lfs failed
可以看到是在切换分支过程中,下载一个 phantomjs.exe 文件时失败,导致分支切换失败。
不要问为什么源代码中有 exe 文件,问就是这是一个屎山项目,详见《屎山并不可怕 - Jeff Tian的文章 - 知乎 》。
如今我们已经对 npm test 习以为常,但你猜猜在 nodejs 还没有被发明出来的上古时代,对前端进行自动化测试是怎么做的?没错,可以用 phantomjs!
无效的尝试
在 .gitattributes 文件中添加忽略这个文件:
python AutoTools/phantomjs.exe filter=lfs diff=lfs merge=lfs -text
无效。
强行切换:
python git checkout -f main
无效。
清空 Git LFS 缓存:
python git lfs prune
无效。
强行重置:
python git reset --hard origin/main
无效。
调试身份认证问题
在搜索引擎的搜索结果中看到了有人指出是 ssh 认证过程中有问题,也看到相应的吐槽,即 git lfs 的认证过程和 git 其他操作的认证表现不一致,导致了在普通操作中没有注意到异常。而在涉及到 lfs 的操作中出错了,但报错信息又没有指出根源,只是说文件下载失败。
教训:如果从文件下载失败的错误早点联想到是下载前的身份认证失败,就能少走很多弯路,节约很多时间。
在命令行输入:
python ➜ ssh git@bitbucket.org git-lfs-authenticate JeffTian/zizhujy.com.git download Bad permissions. Try removing permissions for user: Everyone (S-1-1-0) on file C:/Users/Jeff/.ssh/id_rsa. @@@@@@@@@@@@@@@@@@@@@@@@@@@@@@@@@@@@@@@@@@@@@@@@@@@@@@@@@@@ @ WARNING: UNPROTECTED PRIVATE KEY FILE! @ @@@@@@@@@@@@@@@@@@@@@@@@@@@@@@@@@@@@@@@@@@@@@@@@@@@@@@@@@@@ Permissions for C:UsersJeff/.ssh/id_rsa are too open. It is required that your private key files are NOT accessible by others. This private key will be ignored. Load key C:UsersJeff/.ssh/id_rsa: bad permissions git@bitbucket.org: Permission denied (publickey).
可以看到是权限问题,并且有清晰的提示:需要移除 Everyone 的文件访问权限。
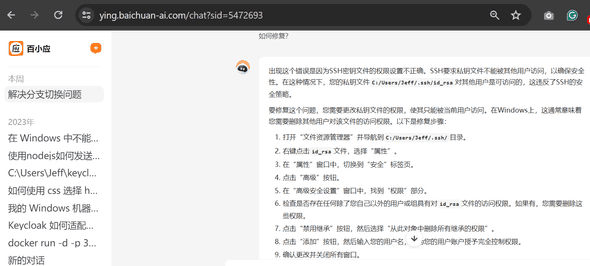
将这个报错扔给 AI(以百小应为例),AI 立即就能给出正确的解决方案了:
<font style=color:rgb(37, 37, 37);>出现这个错误是因为SSH密钥文件的权限设置不正确<font style=color:rgb(37, 37, 37);>。<font style=color:rgb(37, 37, 37);>SSH要求私钥文件不能被其他用户访问,以确保安全性<font style=color:rgb(37, 37, 37);>。<font style=color:rgb(37, 37, 37);>在这种情况下,您的私钥文件<font style=color:rgb(37, 37, 37);background-color:rgb(245, 245, 245);>C:/Users/Jeff/.ssh/id_rsa<font style=color:rgb(37, 37, 37);>对其他用户是可访问的,这违反了SSH的安全策略<font style=color:rgb(37, 37, 37);>。
<font style=color:rgb(37, 37, 37);>要修复这个问题,您需要更改私钥文件的权限,使其只能被当前用户访问<font style=color:rgb(37, 37, 37);>。<font style=color:rgb(37, 37, 37);>在Windows上,这通常意味着您需要删除其他用户对该文件的访问权限<font style=color:rgb(37, 37, 37);>。<font style=color:rgb(37, 37, 37);>以下是修复步骤:
- <font style=color:rgb(37, 37, 37);>打开“文件资源管理器”并导航到<font style=color:rgb(37, 37, 37);background-color:rgb(245, 245, 245);>C:/Users/Jeff/.ssh/<font style=color:rgb(37, 37, 37);>目录<font style=color:rgb(37, 37, 37);>。
- <font style=color:rgb(37, 37, 37);>右键点击<font style=color:rgb(37, 37, 37);background-color:rgb(245, 245, 245);>id_rsa<font style=color:rgb(37, 37, 37);>文件,选择“属性”<font style=color:rgb(37, 37, 37);>。
- <font style=color:rgb(37, 37, 37);>在“属性”窗口中,切换到“安全”标签页<font style=color:rgb(37, 37, 37);>。
- <font style=color:rgb(37, 37, 37);>点击“高级”按钮<font style=color:rgb(37, 37, 37);>。
- <font style=color:rgb(37, 37, 37);>在“高级安全设置”窗口中,找到“权限”部分<font style=color:rgb(37, 37, 37);>。
- <font style=color:rgb(37, 37, 37);>检查是否存在任何除了您自己以外的用户或组具有对<font style=color:rgb(37, 37, 37);background-color:rgb(245, 245, 245);>id_rsa<font style=color:rgb(37, 37, 37);>文件的访问权限<font style=color:rgb(37, 37, 37);>。<font style=color:rgb(37, 37, 37);>如果有,您需要删除这些权限<font style=color:rgb(37, 37, 37);>。
- <font style=color:rgb(37, 37, 37);>点击“禁用继承”按钮,然后选择“从此对象中删除所有继承的权限”<font style=color:rgb(37, 37, 37);>。
- <font style=color:rgb(37, 37, 37);>点击“添加”按钮,然后输入您的用户名,并为您的用户账户授予完全控制权限<font style=color:rgb(37, 37, 37);>。
- <font style=color:rgb(37, 37, 37);>确认更改并关闭所有窗口<font style=color:rgb(37, 37, 37);>。
<font style=color:rgb(37, 37, 37);>完成这些步骤后,您的私钥文件应该只对您自己的用户账户可访问。现在,您应该能够成功使用SSH进行身份验证了。如果问题仍然存在,请确保您的公钥已经正确添加到Bitbucket的SSH密钥列表中。
解决
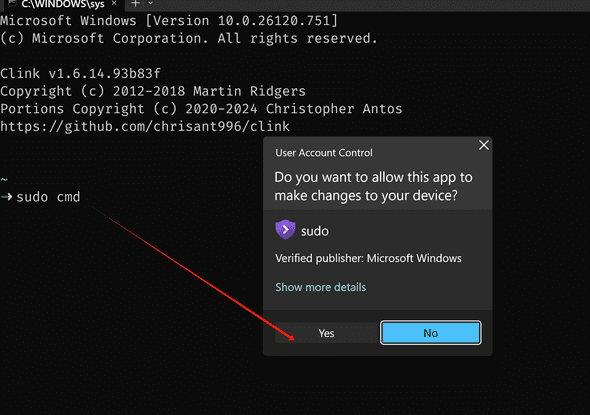
我对通过 Windows 界面修改文件夹或者文件的权限十分熟悉了,但最近越来越不喜欢操作 GUI,于是这次通过命令行来操作:
python sudo cmd # 需要以管理员权限来运行 cmd 以执行权限修改的操作 icacls.exe %USERPROFILE%.sshid_rsa /remove Everyone
以上执行完毕后,居然还是报错,于是再次 list 了一下权限:
python icacls.exe %USERPROFILE%.sshid_rsa
居然还有 Everyone:
python ❯ icacls.exe %USERPROFILE%.sshid_rsa id_rsa JEFF-SURFACE-PRJeff:(F) NT AUTHORITYSYSTEM:(I)(F) BUILTINAdministrators:(I)(F) JEFF-SURFACE-PRJeff:(I)(F) Everyone:(I)(M)
于是猜想是由于继承了文件夹的权限,于是再次从文件夹中移除 Everyone:
python icacls.exe %USERPROFILE%.ssh /remove Everyone
再次切换分支,成功了!
python git checkout main
总结
百小应非常好用,可以媲美 ChatGPT 等,不需要魔法!
对于这个奇怪的错误,还是需要更多的联想,给出更相关的调试信息,才能少走弯路,直接解决问题。


