2023 年 7 月 25 日到 7 月 27 日,我去 AWS 公司参加了 AWS 的架构课,详见《<font style=color:rgb(18, 18, 18);>AWS 架构课整体回顾以及学习资源分享 - Jeff Tian的文章 - 知乎 》。在学习该课程之前,我对 Serverless 用得较多,具体来说,就是对 AWS lambda 用得比较多。而对其他几乎一无所知。在三天的课程里,Serverless 只是其中一天的几个小时的内容,所以其他大多数内容,什么 VPC、Subnet、NAT、CIDR 等等对我来说都是全新的。本来觉得这些新的东西,对我来说没什么用,但没有想到今天就用到了!
我今天利用那天学习到的内容,解决了一个非常实际的问题,那就是让我的其中一个 lambda 函数,拥有固定的出口 IP 地址。
非常长的前情提要:一次写作,多处发表
事情的起源是这样的:我很多年前就基于 AWS lambda,写了一个“万能 BFF”,见《<font style=color:rgb(18, 18, 18);>基于 AWS 构建 BFF 的架构说明 - Jeff Tian的文章 - 知乎 》。它帮我解决了很多问题,其中之一,是将我的语雀文章(是的,我一直使用语雀写文章),自动发布到知乎专栏(《<font style=color:rgb(18, 18, 18);>连点成线,拼凑软件 - Jeff Tian的文章 - 知乎 》)。
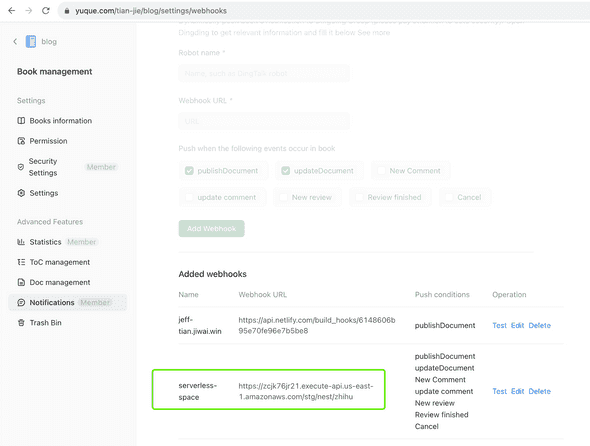
我简单说一下是怎么做的:在使用语雀会员的试用期间,我给自己语雀空间添加了两个 Webhook:一个是用来更新自己的静态站点(《<font style=color:rgb(18, 18, 18);>10 年前老博客以 JAM Stack 方式满血复活! - Jeff Tian的文章 - 知乎 》),将新的文章同步上去。另一个是用来通知我的“万能 BFF”,让其再通知我的“叽歪同步助手”,将新的文章发布到知乎专栏上。
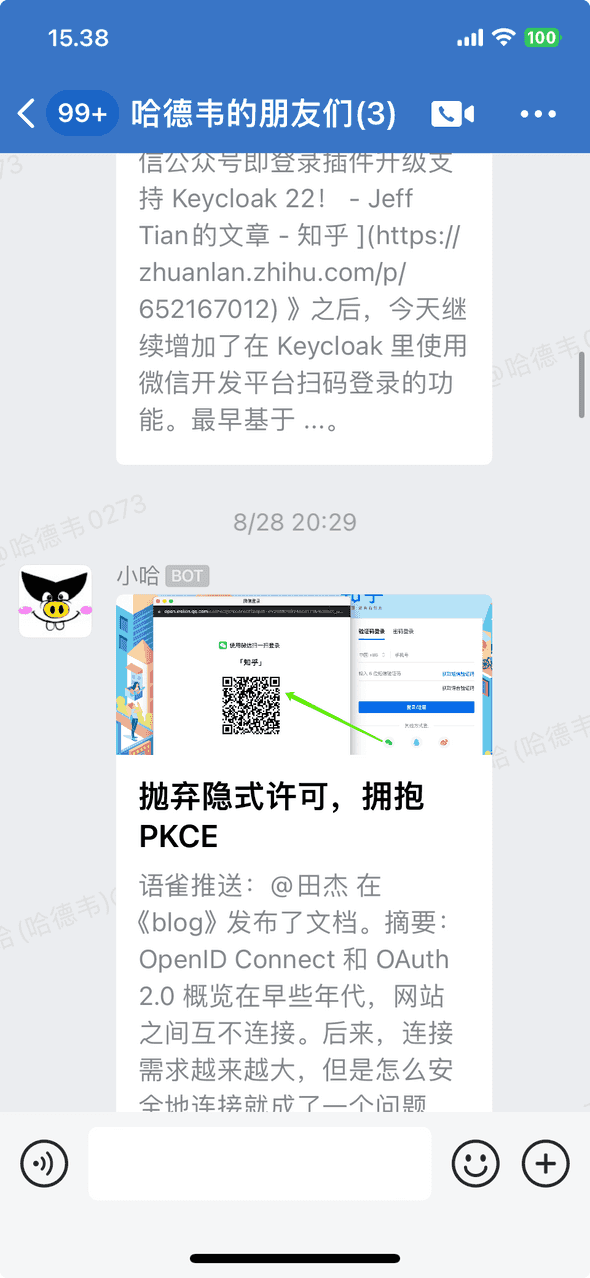
另外,“万能 BFF”收到语雀通知后,除了通知“叽歪同步助手”,还会发送通知给到企业微信机器人,在自己的小群里发布通知:
总之,在语雀上写完后,会同步发布在:
新需求
我希望再自动同步到一个渠道,即微信公众号里。看了一下开发文档,微信公众号有接口可以调用,这些接口都是通过 access_token 来鉴权。接口本身不难,很快就在“万能 BFF”里实现了,完整提交见: https://github.com/Jeff-Tian/serverless-space/commit/2f0a625a57dbc849a164f1314d8c24fa57cca398#diff-7c6e7fb3d1b35e4dbb2fa22a57d45d7788d3a97f7d5647ca607b9375219f9608。
新难点
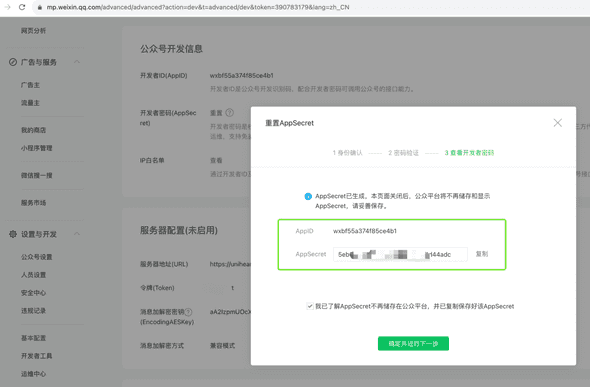
难点在于配置。为了获取微信公众号的 access_token,需要一个 appid 和 appsecret,这可以通过公众号后台的基本配置中的开发信息里获取:
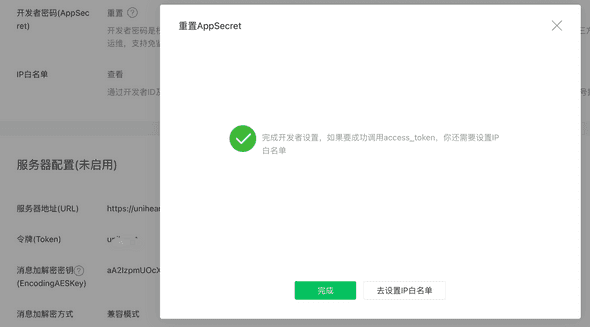
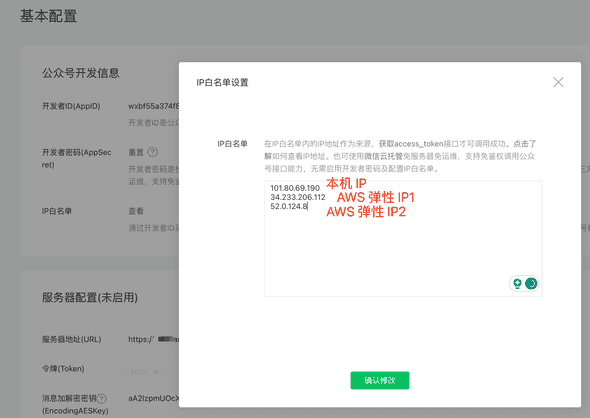
但是没完,还有下一步,必须配置 IP 白名单!否则获取 access_token 时会碰到错误。但是我的“万能 BFF”运行在 AWS lambda 上,并没有一个固定的 IP。我尝试绕过该机制:通过验证不配置、以及用 *、或者 0.0.0.0 之类的,都没有用,在获取 access_token 时都会得到一个 IP 地址不在白名单里的反馈。
解决方案
无奈之下,只要寻找让 AWS lambda 拥有固定 IP 地址的方案,就找到了这篇文章: https://docs.aws.amazon.com/prescriptive-guidance/latest/patterns/generate-a-static-outbound-ip-address-using-a-lambda-function-amazon-vpc-and-a-serverless-architecture.html
照着试了一下,用到了 VPC、子网、路由表等等,感觉又复习了一下《<font style=color:rgb(18, 18, 18);>AWS 架构课整体回顾以及学习资源分享 - Jeff Tian的文章 - 知乎 》!里面的很多步骤,和当时上课时做的实验很像!这很令我兴奋,所以我要接合自己的实际操作,记录一下这个过程,并补充一些原文中没有的截图。
摘要
该解决方案详述了如何使用无服务器架构生成固定的出口 IP 地址。该方案不仅让我这样的个人使用者受益,而且也能使企业使用者受益。不仅能用在对接微信服务的场景,也能用在其他场景。比如当企业间通过安全文件传输协议(SFTP)来发送文件时,接收文件的商业实体需要知道发送方的 IP 地址以便设置允许来自该 IP 的文件通过他们的防火墙。
该方案通过创建一个 AWS lambda 函数,并让它使用弹性 IP 地址作为出口 IP 地址。注意,弹性 IP 地址是固定不变的,我当时上架构课时被这个名称搞晕过,下意识认为弹性 IP 是一个动态 IP,因为只有动态才代表弹性嘛。老师说那就是一个名字,一旦生成是不变的。实测下来,的确如此。
原文中会指引如何创建 lambda,但我的“万能 BFF”里已经创建好了 lambda,因此只需要按照该文章创建 VPC,将出口流量使用静态的 IP 地址通过因特网网关即可。要使用静态 IP 地址,我需要将 Lambda 函数附加到 VPC 和相应的子网中。
前置条件
一个有效的 AWS 账号
我的是 jie_tian
创建和部署 Lambda 函数、以及来创建 VPC 和相应子网的AWS 身份与访问管理(IAM)权限。
这个我在很早前部署“万能 BFF”时已经有了,命名为 lambda-doc-rotary。
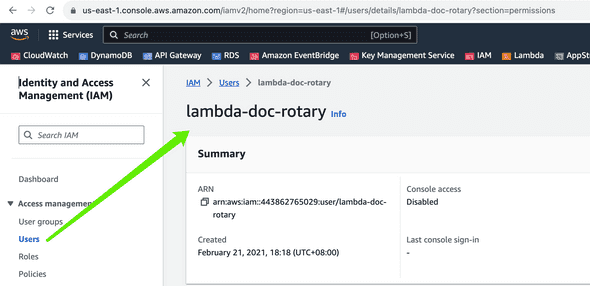
Lambda 的执行角色和用户权限配置
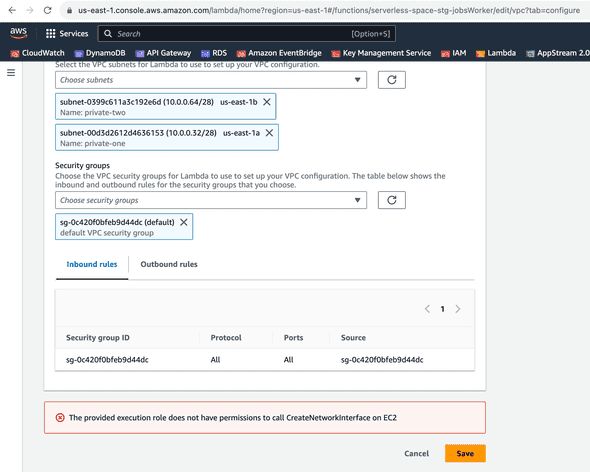
Lambda 是可以和 VPC 连接的,但是需要拥有相应的权限才行,否则会碰到如下错误:
AWS 允许 Lambda 函数连接到同样账号下的 VPC 中的私有子网。私有子网可以用在诸如数据库、缓存实例或者其他内部服务的资源上,所以借助 VPC 和私有子网,可以将运行着的 Lambda 函数连接到内部服务中。
AWS Lambda 使用了你的函数的权限来创建和管理网络接口,要连接到 VPC,你的函数的执行角色必须拥有如下权限。
执行角色权限:
- ec2:CreateNetworkInterface
- <font style=color:rgb(22, 25, 31);>ec2:DescribeNetworkInterfaces
- <font style=color:rgb(22, 25, 31);>ec2:DeleteNetworkInterface<font style=color:rgb(22, 25, 31);>
<font style=color:rgb(22, 25, 31);>当你在配置 VPC 连接时,AWS Lambda 服务还会使用你的权限来验证网络资源,所以在配置 Lambda 连接到 VPC 时,那个操作者用户也需要拥有如下权限。
<font style=color:rgb(22, 25, 31);>用户权限:
- ec2:DescribeSecurityGroups
- ec2:DescribeSubnets
- ec2:DescribeVpcs
<font style=color:rgb(22, 25, 31);>上面的截图,显示了函数的执行角色权限不够,用户(即我的账号 jie_tian)权限没有碰到问题。这是因为“万能 BFF”之前没有这个需求,没有开通这些权限,要修复,需要添加。由于“万能 BFF”使用了 serverless,因此只需要在 <font style=color:rgb(22, 25, 31);>serverless.yml<font style=color:rgb(22, 25, 31);>文件中添加如下内容:
yaml iamRoleStatements: - Effect: Allow Action: - ec2:CreateNetworkInterface - ec2:DescribeNetworkInterfaces - ec2:DeleteNetworkInterface Resource: *
详见提交: https://github.com/Jeff-Tian/serverless-space/commit/753f7aae3e59872dc14cd63be357dd87052339ad 。
使用 VPC 来为 Lambda 绑定静态出口 IP 地址的架构
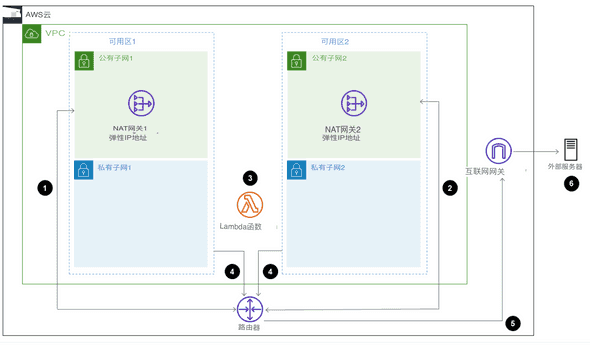
可以用如下图表来展示这个解决方案的无服务器架构:
以上图示展示了如下的工作流:
- <font style=color:rgb(55, 65, 81);background-color:rgb(247, 247, 248);>③ Lambda 函数可以在私有子网 1 或者私有子网 2 中运行。调用外部服务(比如微信的 openapi)产生的出口流量离开 Lambda,到达私有子网。
- <font style=color:rgb(55, 65, 81);background-color:rgb(247, 247, 248);>私有子网 1 和私有子网 2 将流量路由到公有子网中的 NAT 网关。
- <font style=color:rgb(55, 65, 81);background-color:rgb(247, 247, 248);>① 在公有子网 1 中,出口流量离开 NAT 网关 1。
- <font style=color:rgb(55, 65, 81);background-color:rgb(247, 247, 248);>② 在公有子网 2 中,出口流量离开 NAT 网关 2。
- <font style=color:rgb(55, 65, 81);background-color:rgb(247, 247, 248);>⑤ NAT 网关(路由器)将出口流量从公有子网发送到互联网网关
- <font style=color:rgb(55, 65, 81);background-color:rgb(247, 247, 248);>⑥ 出口流量从因特网网关传输到外部服务器。对于我的这种具体情况,上图中的外部服务器就是微信。
技术栈
这里用的技术栈分别是
- Lambda
- Amazon VPC (虚拟私有网络)
自动伸缩
为了确保高可用(HA),可以分别在不同的可用区中使用两个公有子网和两个私有子网(高可用就相当于要有备胎)。
这样就算是一个可用区挂了,整个架构方案仍然正常运作。
工具链简介
- AWS Lambda - AWS Lambda 是一种计算资源,可以在不用分配和管理服务器的情况下运行代码。Lambda 只在需要时运行(对于我的具体情况,就是只有我在语雀写了一篇文章点击发布时,才会运行),并且可以从一天只有几次请求自动伸缩到一秒几千次请求。你仅仅只需要为消费的计算时间付钱,当代码不运行时是不会产生费用的。事实上,由于 AWS 的天量免费额度,目前我的“万能 BFF”还从来没有产生过一分钱账单。
- Amazon VPC - 亚马逊虚拟私有网络是在 AWS 云中分配了一个逻辑隔离的分区,在这里你可以启动 AWS 资源,并运行在你自己定义的虚拟网络中。该虚拟网络和自有的数据中心里的传统网络非常近似,但是拥有更好的可伸缩性基础设施。(没想到普通个人也能拥有一个数据中心了!)
解决方案的实施步骤
创建一个新的 VPC
| 任务 | 描述 | 所需技能 |
|---|---|---|
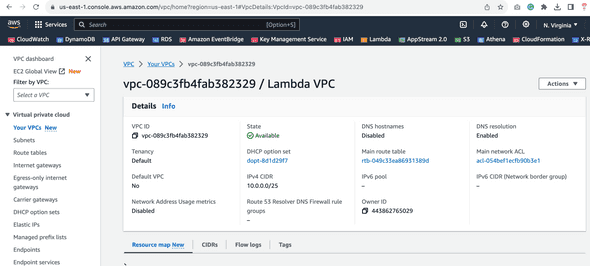
| <font style=color:rgb(22, 25, 31);>创建新的 VPC。 | <font style=color:rgb(22, 25, 31);>登录 AWS 管理控制台,打开 Amazon VPC 控制台,然后创建一个名为<font style=color:rgb(22, 25, 31);> <font style=color:rgb(22, 25, 31);>Lambda VPC<font style=color:rgb(22, 25, 31);> <font style=color:rgb(22, 25, 31);>IPv4 CIDR 范围的 VPC。<font style=color:rgb(22, 25, 31);>10.0.0.0/25 | |
| <font style=color:rgb(22, 25, 31);>有关创建 VPC 的更多信息,请参阅<font style=color:rgb(22, 25, 31);> Amazon VPC 文档中的亚马逊 VPC 入门<font style=color:rgb(22, 25, 31);>。 | <font style=color:rgb(22, 25, 31);>AWS 管理员 |
创建两个公有子网
| 任务 | 描述 | 所需技能 |
|---|---|---|
| <font style=color:rgb(22, 25, 31);>创建第一个公有子网。 | 1. <font style=color:rgb(22, 25, 31);>在 Amazon VPC 控制台上,选择子网<font style=color:rgb(22, 25, 31);>,然后选择创建子网<font style=color:rgb(22, 25, 31);>。 2. <font style=color:rgb(22, 25, 31);>对于名称标签<font style=color:rgb(22, 25, 31);>,输入<font style=color:rgb(22, 25, 31);> <font style=color:rgb(22, 25, 31);>public-one<font style=color:rgb(22, 25, 31);>。 3. <font style=color:rgb(22, 25, 31);>对于<font style=color:rgb(22, 25, 31);> VPC<font style=color:rgb(22, 25, 31);>,选择<font style=color:rgb(22, 25, 31);> <font style=color:rgb(22, 25, 31);>Lambda VPC<font style=color:rgb(22, 25, 31);>。 4. <font style=color:rgb(22, 25, 31);>选择一个可用区并进行记录。 5. <font style=color:rgb(22, 25, 31);>对于<font style=color:rgb(22, 25, 31);> IPv4 CIDR 块<font style=color:rgb(22, 25, 31);>,输入<font style=color:rgb(22, 25, 31);>10.0.0.0/28<font style=color:rgb(22, 25, 31);>然后选择创建<font style=color:rgb(22, 25, 31);>子网。 |
<font style=color:rgb(22, 25, 31);>AWS 管理员 |
| <font style=color:rgb(22, 25, 31);>创建第二个公有子网。 | 1. <font style=color:rgb(22, 25, 31);>在 Amazon VPC 控制台上,选择子网<font style=color:rgb(22, 25, 31);>,然后选择创建子网<font style=color:rgb(22, 25, 31);>。 2. <font style=color:rgb(22, 25, 31);>对于名称标签<font style=color:rgb(22, 25, 31);>,输入<font style=color:rgb(22, 25, 31);> <font style=color:rgb(22, 25, 31);>public-two<font style=color:rgb(22, 25, 31);>。 3. <font style=color:rgb(22, 25, 31);>对于<font style=color:rgb(22, 25, 31);> VPC<font style=color:rgb(22, 25, 31);>,选择<font style=color:rgb(22, 25, 31);> <font style=color:rgb(22, 25, 31);>Lambda VPC<font style=color:rgb(22, 25, 31);>。 4. <font style=color:rgb(22, 25, 31);>选择一个可用区并进行记录。重要<font style=color:rgb(22, 25, 31);>:您不能使用包含<font style=color:rgb(22, 25, 31);>public-one<font style=color:rgb(22, 25, 31);>子网的可用区。 5. <font style=color:rgb(22, 25, 31);>对于<font style=color:rgb(22, 25, 31);> IPv4 CIDR 块<font style=color:rgb(22, 25, 31);>,输入<font style=color:rgb(22, 25, 31);>10.0.0.16/28<font style=color:rgb(22, 25, 31);>然后选择创建<font style=color:rgb(22, 25, 31);>子网。 |
<font style=color:rgb(22, 25, 31);>AWS 管理员 |
创建两个私有子网
| 任务 | 描述 | 所需技能 |
|---|---|---|
| <font style=color:rgb(22, 25, 31);>创建第一个私有子网。 | 1. <font style=color:rgb(22, 25, 31);>在 Amazon VPC 控制台上,选择子网<font style=color:rgb(22, 25, 31);>,然后选择创建子网<font style=color:rgb(22, 25, 31);>。 | |
| 2. <font style=color:rgb(22, 25, 31);>对于名称标签<font style=color:rgb(22, 25, 31);>,输入<font style=color:rgb(22, 25, 31);> <font style=color:rgb(22, 25, 31);>private-one<font style=color:rgb(22, 25, 31);>。 | ||
| 3. <font style=color:rgb(22, 25, 31);>对于<font style=color:rgb(22, 25, 31);> VPC<font style=color:rgb(22, 25, 31);>,选择<font style=color:rgb(22, 25, 31);> <font style=color:rgb(22, 25, 31);>Lambda VPC<font style=color:rgb(22, 25, 31);>。 | ||
| 4. <font style=color:rgb(22, 25, 31);>选择包含您之前创建的<font style=color:rgb(22, 25, 31);>public-one<font style=color:rgb(22, 25, 31);>子网的可用区。 | ||
| 5. <font style=color:rgb(22, 25, 31);>对于<font style=color:rgb(22, 25, 31);> IPv4 CIDR 块<font style=color:rgb(22, 25, 31);>,输入<font style=color:rgb(22, 25, 31);>10.0.0.32/28<font style=color:rgb(22, 25, 31);>然后选择创建<font style=color:rgb(22, 25, 31);>子网。 | <font style=color:rgb(22, 25, 31);>AWS 管理员 | |
| <font style=color:rgb(22, 25, 31);>创建第二个私有子网。 | 1. <font style=color:rgb(22, 25, 31);>在 Amazon VPC 控制台上,选择子网<font style=color:rgb(22, 25, 31);>,然后选择创建子网<font style=color:rgb(22, 25, 31);>。 | |
| 2. <font style=color:rgb(22, 25, 31);>对于名称标签<font style=color:rgb(22, 25, 31);>,输入<font style=color:rgb(22, 25, 31);> <font style=color:rgb(22, 25, 31);>private-two<font style=color:rgb(22, 25, 31);>。 | ||
| 3. <font style=color:rgb(22, 25, 31);>对于<font style=color:rgb(22, 25, 31);> VPC<font style=color:rgb(22, 25, 31);>,选择<font style=color:rgb(22, 25, 31);> <font style=color:rgb(22, 25, 31);>Lambda VPC<font style=color:rgb(22, 25, 31);>。 | ||
| 4. <font style=color:rgb(22, 25, 31);>选择包含您之前创建的<font style=color:rgb(22, 25, 31);>public-two<font style=color:rgb(22, 25, 31);>子网的相同可用区。 | ||
| 5. <font style=color:rgb(22, 25, 31);>对于<font style=color:rgb(22, 25, 31);> IPv4 CIDR 块<font style=color:rgb(22, 25, 31);>,输入<font style=color:rgb(22, 25, 31);>10.0.0.64/28<font style=color:rgb(22, 25, 31);>然后选择创建<font style=color:rgb(22, 25, 31);>子网。 | <font style=color:rgb(22, 25, 31);>AWS 管理员 |
为 NAT 网关创建两个弹性 IP 地址
| 任务 | 描述 | 所需技能 |
|---|---|---|
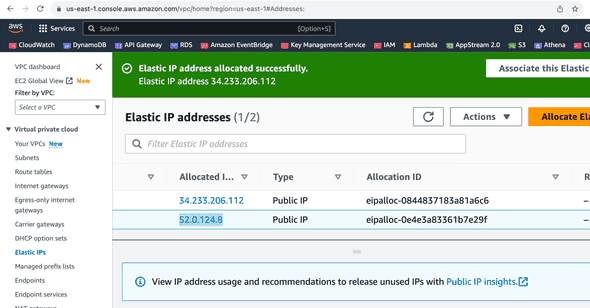
| <font style=color:rgb(22, 25, 31);>创建第一个弹性 IP 地址。 | 1. <font style=color:rgb(22, 25, 31);>在 Amazon VPC 控制台上,选择弹性 IP<font style=color:rgb(22, 25, 31);>,然后选择分配新地址<font style=color:rgb(22, 25, 31);>。 2. <font style=color:rgb(22, 25, 31);>选择分配,然后记录您新创建的弹性 IP 地址的分配 ID<font style=color:rgb(22, 25, 31);>。 注意<font style=color:rgb(22, 25, 31);>:此弹性 IP 地址用于您的第一个 NAT 网关。 |
<font style=color:rgb(22, 25, 31);>AWS 管理员 |
| <font style=color:rgb(22, 25, 31);>创建第二个弹性 IP 地址。 | 1. <font style=color:rgb(22, 25, 31);>在 Amazon VPC 控制台上,选择弹性 IP<font style=color:rgb(22, 25, 31);>,然后选择分配新地址<font style=color:rgb(22, 25, 31);>。 2. <font style=color:rgb(22, 25, 31);>选择分配<font style=color:rgb(22, 25, 31);>并记录第二个弹性 IP 地址的分配 ID<font style=color:rgb(22, 25, 31);>。 注意<font style=color:rgb(22, 25, 31);>:此弹性 IP 地址用于您的第二个 NAT 网关。 |
<font style=color:rgb(22, 25, 31);>AWS 管理员 |
就是这两个弹性 IP 地址,我需要添加到微信后台的 IP 白名单中:
创建互联网网关
| 任务 | 描述 | 所需技能 |
|---|---|---|
| <font style=color:rgb(22, 25, 31);>创建互联网网关。 | 1. <font style=color:rgb(22, 25, 31);>在亚马逊 VPC 控制台上,选择互联网网关<font style=color:rgb(22, 25, 31);>,然后选择创建互联网网关<font style=color:rgb(22, 25, 31);>。 | |
| 2. <font style=color:rgb(22, 25, 31);>输入名称<font style=color:rgb(22, 25, 31);>Lambda internet gateway<font style=color:rgb(22, 25, 31);>,然后选择创建互联网网关<font style=color:rgb(22, 25, 31);>。确保记录互联网网关 ID。 | <font style=color:rgb(22, 25, 31);>AWS 管理员 | |
| <font style=color:rgb(22, 25, 31);>将互联网网关连接到 VPC。 | <font style=color:rgb(22, 25, 31);>选择刚刚创建的 Internet 网关,然后选择<font style=color:rgb(22, 25, 31);> Actions, Attach to VPC (操作,附加到 VPC)<font style=color:rgb(22, 25, 31);>。 | <font style=color:rgb(22, 25, 31);>AWS 管理员 |
<font style=color:rgb(22, 25, 31);background-color:rgb(250, 250, 250);>创建两个 NAT 网关
| 任务 | 描述 | 所需技能 |
|---|---|---|
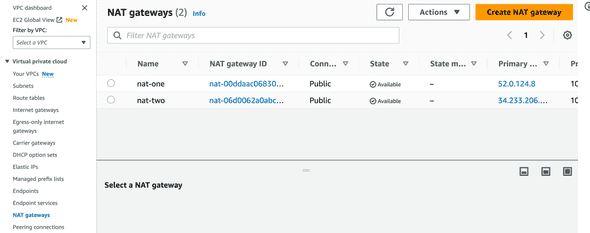
| <font style=color:rgb(22, 25, 31);>创建第一个 NAT 网关。 | 1. <font style=color:rgb(22, 25, 31);>在亚马逊 VPC 控制台上,选择<font style=color:rgb(22, 25, 31);> NAT 网关<font style=color:rgb(22, 25, 31);>,然后选择创建 NAT 网关<font style=color:rgb(22, 25, 31);>。 2. <font style=color:rgb(22, 25, 31);>输入 N<font style=color:rgb(22, 25, 31);> <font style=color:rgb(22, 25, 31);>nat-one<font style=color:rgb(22, 25, 31);> <font style=color:rgb(22, 25, 31);>AT 网关名称。 3. <font style=color:rgb(22, 25, 31);>选择<font style=color:rgb(22, 25, 31);>public-one<font style=color:rgb(22, 25, 31);>作为创建 NAT 网关的子网。 4. <font style=color:rgb(22, 25, 31);>对于 “连接类型<font style=color:rgb(22, 25, 31);>”,选择 “公<font style=color:rgb(22, 25, 31);>用”。 5. <font style=color:rgb(22, 25, 31);>对于弹性 IP 分配 ID<font style=color:rgb(22, 25, 31);>,选择您之前创建的第一个弹性 IP 地址并将其与 NAT 网关关联。 6. <font style=color:rgb(22, 25, 31);>选择创建 NAT 网关<font style=color:rgb(22, 25, 31);>。 |
<font style=color:rgb(22, 25, 31);>AWS 管理员 |
| <font style=color:rgb(22, 25, 31);>创建第二个 NAT 网关。 | 1. <font style=color:rgb(22, 25, 31);>在亚马逊 VPC 控制台上,选择<font style=color:rgb(22, 25, 31);> NAT 网关<font style=color:rgb(22, 25, 31);>,然后选择创建 NAT 网关<font style=color:rgb(22, 25, 31);>。 2. <font style=color:rgb(22, 25, 31);>输入 N<font style=color:rgb(22, 25, 31);> <font style=color:rgb(22, 25, 31);>nat-two<font style=color:rgb(22, 25, 31);> <font style=color:rgb(22, 25, 31);>AT 网关名称。 3. <font style=color:rgb(22, 25, 31);>选择<font style=color:rgb(22, 25, 31);>public-two<font style=color:rgb(22, 25, 31);>作为创建 NAT 网关的子网。 4. <font style=color:rgb(22, 25, 31);>对于 “连接类型<font style=color:rgb(22, 25, 31);>”,选择 “公<font style=color:rgb(22, 25, 31);>用”。 5. <font style=color:rgb(22, 25, 31);>对于弹性 IP 分配 ID<font style=color:rgb(22, 25, 31);>,选择您之前创建的第二个弹性 IP 地址并将其与 NAT 网关关联。 6. <font style=color:rgb(22, 25, 31);>选择创建 NAT 网关<font style=color:rgb(22, 25, 31);>。 |
<font style=color:rgb(22, 25, 31);>AWS 管理员 |
<font style=color:rgb(22, 25, 31);background-color:rgb(250, 250, 250);>为公有子网和私有子网创建路由表
| 任务 | 描述 | 所需技能 |
|---|---|---|
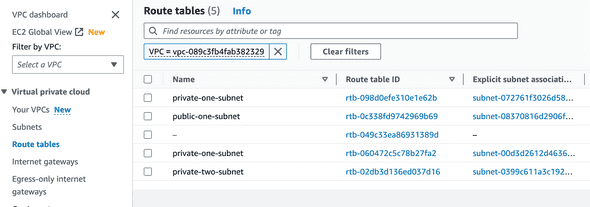
| <font style=color:rgb(22, 25, 31);>为 public-one 子网创建路由表。 | 1. <font style=color:rgb(22, 25, 31);>在 Amazon VPC 控制台上,选择路由表<font style=color:rgb(22, 25, 31);>,然后选择创建路由表<font style=color:rgb(22, 25, 31);>。 | |
| 2. <font style=color:rgb(22, 25, 31);>输入<font style=color:rgb(22, 25, 31);>public-one-subnet<font style=color:rgb(22, 25, 31);>作为路由表名称,然后选择创建路由表<font style=color:rgb(22, 25, 31);>。 | ||
| 3. <font style=color:rgb(22, 25, 31);>选择<font style=color:rgb(22, 25, 31);>public-one-subnet<font style=color:rgb(22, 25, 31);>路由表,选择编辑路由<font style=color:rgb(22, 25, 31);>,然后选择添加路由<font style=color:rgb(22, 25, 31);>。 | ||
| 4. <font style=color:rgb(22, 25, 31);>在 “目标<font style=color:rgb(22, 25, 31);>” 框<font style=color:rgb(22, 25, 31);>0.0.0.0<font style=color:rgb(22, 25, 31);>中指定,然后在 “目标<font style=color:rgb(22, 25, 31);>” 列表中选择 Internet 网关 ID。 | ||
| 5. <font style=color:rgb(22, 25, 31);>在子网关联<font style=color:rgb(22, 25, 31);>选项卡上,选择编辑子网关联<font style=color:rgb(22, 25, 31);>,选择<font style=color:rgb(22, 25, 31);>具有<font style=color:rgb(22, 25, 31);> <font style=color:rgb(22, 25, 31);>10.0.0.0/28<font style=color:rgb(22, 25, 31);> <font style=color:rgb(22, 25, 31);>CIDR 范围的<font style=color:rgb(22, 25, 31);>public-one<font style=color:rgb(22, 25, 31);>子网,然后选择保存关联<font style=color:rgb(22, 25, 31);>。 | ||
| 6. <font style=color:rgb(22, 25, 31);>选择<font style=color:rgb(22, 25, 31);> Save Changes<font style=color:rgb(22, 25, 31);>(保存更改)。 | <font style=color:rgb(22, 25, 31);>AWS 管理员 | |
| <font style=color:rgb(22, 25, 31);>为 public-two 子网创建路由表。 | 1. <font style=color:rgb(22, 25, 31);>在 Amazon VPC 控制台上,选择路由表<font style=color:rgb(22, 25, 31);>,然后选择创建路由表<font style=color:rgb(22, 25, 31);>。 | |
| 2. <font style=color:rgb(22, 25, 31);>输入<font style=color:rgb(22, 25, 31);>public-two-subnet<font style=color:rgb(22, 25, 31);>作为路由表名称,然后选择创建路由表<font style=color:rgb(22, 25, 31);>。 | ||
| 3. <font style=color:rgb(22, 25, 31);>选择<font style=color:rgb(22, 25, 31);>public-two-subnet<font style=color:rgb(22, 25, 31);>路由表,选择编辑路由<font style=color:rgb(22, 25, 31);>,然后选择添加路由<font style=color:rgb(22, 25, 31);>。 | ||
| 4. <font style=color:rgb(22, 25, 31);>在 “目标<font style=color:rgb(22, 25, 31);>” 框<font style=color:rgb(22, 25, 31);>0.0.0.0<font style=color:rgb(22, 25, 31);>中指定,然后在 “目标<font style=color:rgb(22, 25, 31);>” 列表中选择 Internet 网关 ID。 | ||
| 5. <font style=color:rgb(22, 25, 31);>在子网关联<font style=color:rgb(22, 25, 31);>选项卡上,选择编辑子网关联<font style=color:rgb(22, 25, 31);>,选择具有<font style=color:rgb(22, 25, 31);> <font style=color:rgb(22, 25, 31);>10.0.0.16/28<font style=color:rgb(22, 25, 31);> <font style=color:rgb(22, 25, 31);>CIDR 范围的<font style=color:rgb(22, 25, 31);>public-two<font style=color:rgb(22, 25, 31);>子网,然后选择保存关联<font style=color:rgb(22, 25, 31);>。 | ||
| 6. <font style=color:rgb(22, 25, 31);>选择<font style=color:rgb(22, 25, 31);> Save Changes<font style=color:rgb(22, 25, 31);>(保存更改)。 | <font style=color:rgb(22, 25, 31);>AWS 管理员 | |
| <font style=color:rgb(22, 25, 31);>为私有子网创建路由表。 | 1. <font style=color:rgb(22, 25, 31);>在 Amazon VPC 控制台上,选择路由表<font style=color:rgb(22, 25, 31);>,然后选择创建路由表<font style=color:rgb(22, 25, 31);>。 | |
| 2. <font style=color:rgb(22, 25, 31);>输入<font style=color:rgb(22, 25, 31);>private-one-subnet<font style=color:rgb(22, 25, 31);>作为路由表名称,然后选择创建路由表<font style=color:rgb(22, 25, 31);>。 | ||
| 3. <font style=color:rgb(22, 25, 31);>选择<font style=color:rgb(22, 25, 31);>private-one-subnet<font style=color:rgb(22, 25, 31);>路由表,选择编辑路由<font style=color:rgb(22, 25, 31);>,然后选择添加路由<font style=color:rgb(22, 25, 31);>。 | ||
| 4. <font style=color:rgb(22, 25, 31);>0.0.0.0<font style=color:rgb(22, 25, 31);>在目标<font style=color:rgb(22, 25, 31);>框中指定,然后在目标<font style=color:rgb(22, 25, 31);>列表的<font style=color:rgb(22, 25, 31);>public-one<font style=color:rgb(22, 25, 31);>子网中选择 NAT 网关。 | ||
| 5. <font style=color:rgb(22, 25, 31);>在子网关联<font style=color:rgb(22, 25, 31);>选项卡上,选择编辑子网关联<font style=color:rgb(22, 25, 31);>,选择具有<font style=color:rgb(22, 25, 31);> <font style=color:rgb(22, 25, 31);>10.0.0.32/28<font style=color:rgb(22, 25, 31);> <font style=color:rgb(22, 25, 31);>CIDR 范围的<font style=color:rgb(22, 25, 31);>private-one<font style=color:rgb(22, 25, 31);>子网,然后选择保存关联<font style=color:rgb(22, 25, 31);>。 | ||
| 6. <font style=color:rgb(22, 25, 31);>选择<font style=color:rgb(22, 25, 31);> Save Changes<font style=color:rgb(22, 25, 31);>(保存更改)。 | <font style=color:rgb(22, 25, 31);>AWS 管理员 | |
| <font style=color:rgb(22, 25, 31);>为私有二子网创建路由表。 | 1. <font style=color:rgb(22, 25, 31);>在 Amazon VPC 控制台上,选择路由表<font style=color:rgb(22, 25, 31);>,然后选择创建路由表<font style=color:rgb(22, 25, 31);>。 | |
| 2. <font style=color:rgb(22, 25, 31);>输入<font style=color:rgb(22, 25, 31);>private-two-subnet<font style=color:rgb(22, 25, 31);>作为路由表名称,然后选择创建路由表<font style=color:rgb(22, 25, 31);>。 | ||
| 3. <font style=color:rgb(22, 25, 31);>选择<font style=color:rgb(22, 25, 31);>private-two-subnet<font style=color:rgb(22, 25, 31);>路由表,选择编辑路由<font style=color:rgb(22, 25, 31);>,然后选择添加路由<font style=color:rgb(22, 25, 31);>。 | ||
| 4. <font style=color:rgb(22, 25, 31);>0.0.0.0<font style=color:rgb(22, 25, 31);>在目标<font style=color:rgb(22, 25, 31);>框中指定,然后在目标<font style=color:rgb(22, 25, 31);>列表的<font style=color:rgb(22, 25, 31);>public-two<font style=color:rgb(22, 25, 31);>子网中选择 NAT 网关。 | ||
| 5. <font style=color:rgb(22, 25, 31);>在子网关联<font style=color:rgb(22, 25, 31);>选项卡上,选择编辑子网关联<font style=color:rgb(22, 25, 31);>,选择具有<font style=color:rgb(22, 25, 31);> <font style=color:rgb(22, 25, 31);>10.0.0.64/28<font style=color:rgb(22, 25, 31);> <font style=color:rgb(22, 25, 31);>CIDR 范围的<font style=color:rgb(22, 25, 31);>private-two<font style=color:rgb(22, 25, 31);>子网,然后选择保存关联<font style=color:rgb(22, 25, 31);>。 | ||
| 6. <font style=color:rgb(22, 25, 31);>选择<font style=color:rgb(22, 25, 31);> Save Changes<font style=color:rgb(22, 25, 31);>(保存更改)。 | <font style=color:rgb(22, 25, 31);>AWS 管理员 |
<font style=color:rgb(22, 25, 31);background-color:rgb(250, 250, 250);>创建 Lambda 函数,将其添加到 VPC,然后测试解决方案
| 任务 | 描述 | 所需技能 |
|---|---|---|
| <font style=color:rgb(22, 25, 31);>新建 Lambda 函数。 | 1. <font style=color:rgb(22, 25, 31);>打开 AWS Lambda 控制台并选择创建函数<font style=color:rgb(22, 25, 31);>。 2. <font style=color:rgb(22, 25, 31);>在 “基本信息<font style=color:rgb(22, 25, 31);>”<font style=color:rgb(22, 25, 31);> <font style=color:rgb(22, 25, 31);>Lambda test<font style=color:rgb(22, 25, 31);> <font style=color:rgb(22, 25, 31);>下,在 “函数名称<font style=color:rgb(22, 25, 31);>” 下输入,然后在 “运行时<font style=color:rgb(22, 25, 31);>” 下选择您选择的语言。 3. <font style=color:rgb(22, 25, 31);>选择<font style=color:rgb(22, 25, 31);> Create function (创建函数)<font style=color:rgb(22, 25, 31);>。 |
<font style=color:rgb(22, 25, 31);>AWS 管理员 |
| <font style=color:rgb(22, 25, 31);>将 Lambda 函数添加到您的 VPC。 | 1. <font style=color:rgb(22, 25, 31);>在 AWS Lambda 控制台上,选择函<font style=color:rgb(22, 25, 31);>数,然后选择您之前创建的函数。 2. <font style=color:rgb(22, 25, 31);>选择<font style=color:rgb(22, 25, 31);> Configuration<font style=color:rgb(22, 25, 31);>(配置),然后选择<font style=color:rgb(22, 25, 31);> VPC<font style=color:rgb(22, 25, 31);>。 3. <font style=color:rgb(22, 25, 31);>选择编辑<font style=color:rgb(22, 25, 31);>,<font style=color:rgb(22, 25, 31);>Lambda VPC<font style=color:rgb(22, 25, 31);>然后选择两个私有子网。 4. <font style=color:rgb(22, 25, 31);>选择 “用于测试目的的默认安全组<font style=color:rgb(22, 25, 31);>”,然后选择 “保存<font style=color:rgb(22, 25, 31);>”。 |
<font style=color:rgb(22, 25, 31);>AWS 管理员 |
| <font style=color:rgb(22, 25, 31);>编写调用外部服务的代码。 | 1. <font style=color:rgb(22, 25, 31);>使用您选择的编程语言,编写代码来调用返回您的 IP 地址的外部服务。 2. <font style=color:rgb(22, 25, 31);>验证返回的 IP 地址是否与您的一个弹性 IP 地址相匹配。 |
<font style=color:rgb(22, 25, 31);>AWS 管理员 |
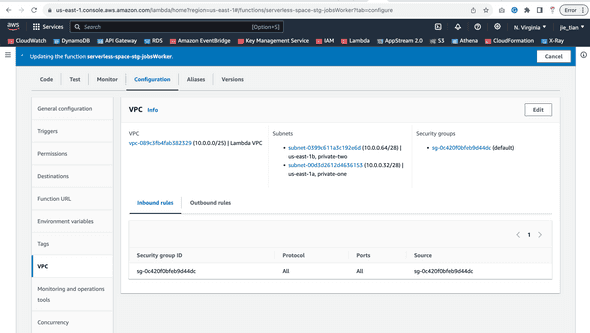
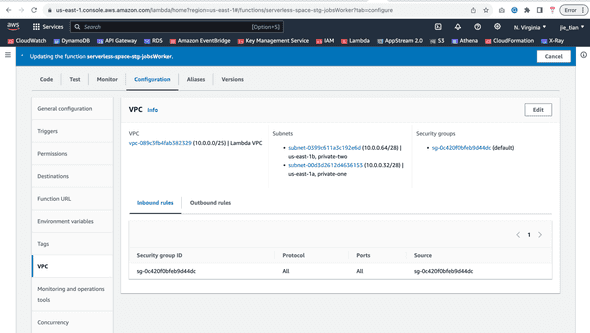
对于我的具体场景,我不需要再额外创建 Lambda 函数,也不需要编写额外的代码,仅需要将 Lambda 函数连接到 VPC 即可。见最开始的截图所示,最后成功连接后是这样:
完成之后,我只需要发布一篇语雀博文,就会自动出现在我的公众号里。
方案验证
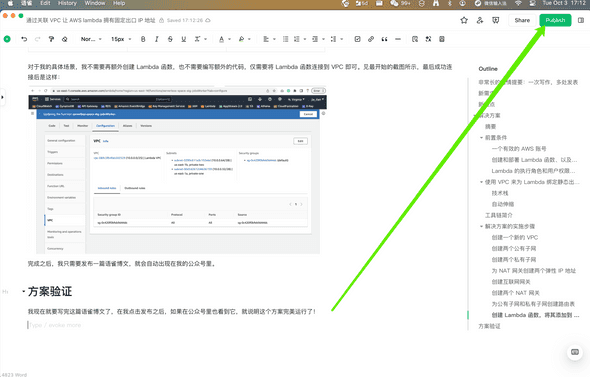
我现在就要写完这篇语雀博文了,在我点击发布之后,如果在公众号里也看到它,就说明这个方案完美运行了!
后续
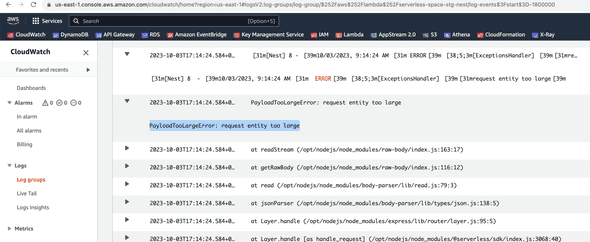
好吧,一波三折,事实上并没有那么顺利。第一次测试,我应该写一篇短文才好,这么长一篇文章,导致超过了 Express 默认的 100kb 载荷限制了。
由于“万能 BFF”使用了 NestJs,并且底层 HTTP 框架是 Express Js,要让本篇长文通过这个测试,需要加大载荷限制。一篇长文,写了几个小时写完了,本以为就成功了,没想到最后碰到了一个“小”问题,花了额外的几倍时间才解决。
暴露根因
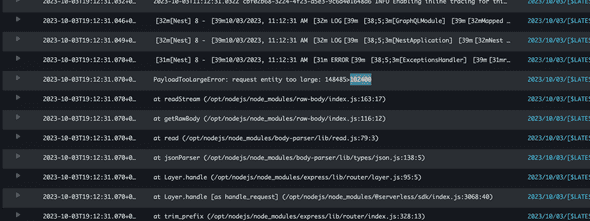
首先,这个限制到底是多少?通过《<font style=color:rgb(18, 18, 18);>ChatGPT 教我如何修改 node_modules 里的代码 - Jeff Tian的文章 - 知乎 》介绍的方法,我用 postinstall 魔改了 raw-body,让它对外抛出这个限制数字,发现是 102400。
javascript const fs = require(fs);
function patchFile(patch) { fs.readFile(patch, utf8, (err, data) => { if (err) { console.error(err); return; }
    const modifiedData = data.replace(
        /returns+done(createError(413,s+requests+entitys+toos+large,s+{/g,
        return done(createError(413, request entity too large:  + length + > + limit, {
    );

    fs.writeFile(patch, modifiedData, utf8, (err) => {
        if (err) {
            console.error(err);
            return;
        }

        console.log(File modified successfully!  + patch);
    });
});
}
patchFile(node_modules/raw-body/index.js); patchFile(node_modules/@nestjs/platform-express/node_modules/raw-body/index.js);
这个问题最根本的原因在于 body-parser 这个底层库,对 request body 默认限制了 102400 字节的大小,而且用了一个闭包技术读取配置的 limit,造成上层框架很难改掉这个默认 limit。
个人觉得这个 body-parser 实在太多事了,干嘛写这个限制?如果应用开发者想要限制,可以在网关层限制。做为 parser,就应该无脑 parse 就行。吐槽完毕,下面还是需要找个解决办法。由于各种传递 {limit: 10mb}等解决方案均不工作,最后不得已禁用了 bodyParser:
diff const app = await NestFactory.create(AppModule, { logger: [error, warn, log], snapshot: true,
-
});bodyParser: false,
然后,从 @Body 得到的 Buffer 自己完成 JSON 解析,完整提交见: https://github.com/Jeff-Tian/serverless-space/commit/6abd87a8f1612f9f9e7264fc571951671abc88b3
等待 CICD 完成,再次发布测试。

