我对 React 高阶组件一直有听说,但从来没有用过,也不知道在什么场景下值得用它。今天终于用了一下,感觉太棒了,对它有了一个直观的认识:可以让代码变得更少,减少写新组件的负担。
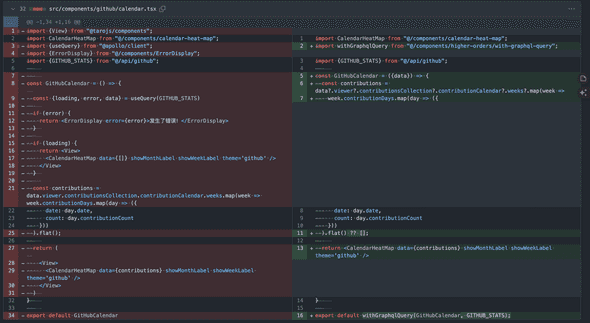
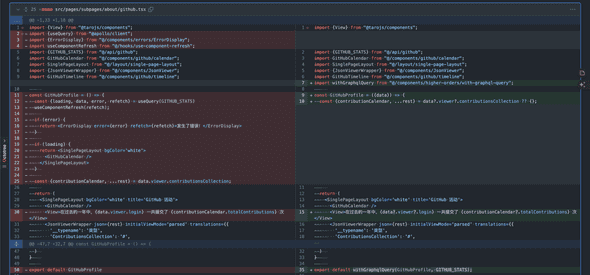
使用高阶组件的前后代码对比
同样的功能,代码行数减少一半
在一个组件中应用高阶组件之后,代码从 34 行变为 16 行:

在一整个页面应用高阶组件之后,代码从 50 行减少到 35 行:

减少写新组件的心智负担
应用高阶组件之后,需要考虑数据获取中的等待状态;数据获取失败的状态以及数据获取成功之后的状态;应用高阶组件之后,写新组件只需要考虑一种状态,即数据获取成功的组件状态这一种。
为什么呢?请听我细细道来。
背景与分析
我发现一个现象,无论是在写组件也好,还是在写整个页面也好(整个页面无非就是多个组件的组合而已),都有一个固定模式:
一、数据获取,这通常是一个 HTTP 请求。
二、由于是一个网络请求,就会有请求的等待状态、请求失败状态和请求成功的状态。
三、写组件的过程,无非就是分别响应以上三种状态的过程。
四、先写这个 HTTP 请求的代码
五、判断是否正在请求的过程中,如果是,就显示一个加载中的组件、或者目标组件的空状态组件
六、判断是否出错,如果出错了,就显示一个出错信息,并放置一个允许用户重试的按钮
七、能走到这一步,说明拿到了预期的数据,用目标组件来展示数据
可以看出,尽管每个组件或者页面都不一样,但是整体步骤上都是一致的,只是细节不同而已。比如对于先写 HTTP 请求的代码这一步,都是一样的,只是具体的请求查询参数不同而已。而对于显示加载中和错误信息可以认为几乎一样,没有区别。最后渲染数据这一步,区别最大。
做为程序员,最不想做重复的事情,于是抽出以上的共性后,就想着将它们封装起来。
效果
在线示例见: https://taro.jefftian.dev/pages/subpages/about/github
最后通过高阶组件达到的效果就是,写新组件时,不再写发送 HTTP 请求的代码,而只需要指定查询参数;完全不写关于加载中和错误信息相关的代码;只关注最后一步,即每个组件区别最大的地方。
对于这一步,总是假设成功地拿到了数据,对这个数据做一些处理,然后使用页面元素去展示它。
比如原来要这样写的组件:
typescript
import {View} from @tarojs/components;
import CalendarHeatMap from @/components/calendar-heat-map;
import {useQuery} from @apollo/client;
import {ErrorDisplay} from @/components/ErrorDisplay;
import {GITHUB_STATS} from @/api/github;
const GitHubCalendar = () => { const {loading, error, data} = useQuery(GITHUB_STATS)
if (error) {
return
if (loading) {
return
const contributions = data.viewer.contributionsCollection.contributionCalendar.weeks.map(week => week.contributionDays.map(day => ({ date: day.date, count: day.contributionCount })) ).flat();
return (
export default GitHubCalendar
现在只需要假设数据已经获取到了,写一个展示数据的代码就好: typescript import CalendarHeatMap from @/components/calendar-heat-map; import withGraphqlQuery from @/components/higher-orders/with-graphql-query; import {GITHUB_STATS} from @/api/github;
const GitHubCalendar = ({data}) => { const contributions = data?.viewer?.contributionsCollection?.contributionCalendar?.weeks?.map((week: { contributionDays: any[]; }) => week.contributionDays.map(day => ({ date: day.date, count: day.contributionCount })) ).flat() ?? [];
return
export default withGraphqlQuery(GitHubCalendar, GITHUB_STATS);
第二种写法就非常省时省力了,效果不仅不比原来的差,甚至自带了骨架屏的效果。当然,需要注意 data 有可能是 undefined,所以采用了 data? 这样的访问方式。
获取到数据前的展示:

获取到数据之后的展示:

具体实现
withGraphqlQuery
在背景与分析里提到,一个组件无非就是通过向后端请求数据,再根据请求的状态(请求中、请求失败、请求成功三种状态)进行对应的渲染而已。于是要抽象出来的高阶组件,就自然地想到了名字:withHttpRequest。但是对于我实验的具体项目来讲,向后端发送请求是通过 GraphQL 来完成的(详见《一顿操作猛如虎,部署一个万能 BFF - Jeff Tian的文章 - 知乎 》),所以取了个名字叫做 withGraphqlQuery。
代码如下:
typescript
import {DocumentNode, useQuery} from @apollo/client;
import useComponentRefresh from @/hooks/use-component-refresh;
import {ErrorDisplay} from @/components/errors/ErrorDisplay;
import React from react;
import ErrorBoundary from @/components/errors/error-boundary;
interface WithGraphqlQueryProps
interface HOCProps
const DefaultLoadingComponent: React.FC = () =>
/**
- A higher order component that wraps a component with a graphql query.
- The component to wrap, all it needs to do is handle the data prop. error and such are handled by this HOC.
- @param WrappedComponent
- @param query
*/
function withGraphqlQuery<TData = any>(WrappedComponent: React.ComponentType<WithGraphqlQueryProps
if (error) {
  const ErrorComponentToRender = ErrorComponent || DefaultErrorComponent;
  return <ErrorComponentToRender error={error} refetch={refetch} />
}

if (loading || !data) {
  const LoadingComponentToRender = LoadingComponent || DefaultLoadingComponent;
  return <ErrorBoundary fallback={<LoadingComponentToRender />}>
    <WrappedComponent data={undefined} {...rest} />
  </ErrorBoundary>
}

return <WrappedComponent data={data} {...rest} />
}
return HOC; }
export default withGraphqlQuery;
对于出错的处理
ErrorDisplay
对于请求数据出错,会展示一个错误信息,并展示一个重试按钮。定义了一个 ErrorDisplay 类: typescript import {Button, View} from @tarojs/components; import * as util from util;
export const ErrorDisplay = ({error, children, refetch}: { error: object, children: any, refetch?: any }) => <View className=at-article
还有另一种出错情况,这是目前设计导致的。目前的设计是在当请求数据过程中,会优先展示一个空组件,详见 withGraphqlQuery 的实现,会往目标组件里传入一个 undefined 做为数据。这时目标组件对 undefined 处理得好,就自动呈现了骨架屏的效果。
尽管该设计要求目标组件一定要优雅地去获取 data,从而处理好 undefined 的情况;但是如果目标组件没有处理好,就会出现尝试从 undefined 里对数据进行解构获取的错误,对于这种渲染时的错误,定义了一个 ErrorBoundary 来捕获:
typescript
import React from react;
interface ErrorBoundaryProps { fallback: React.ReactElement; }
interface ErrorBoundaryState { hasError: boolean; }
export default class ErrorBoundary extends React.Component<ErrorBoundaryProps, ErrorBoundaryState> { constructor(props: ErrorBoundaryProps) { super(props);
this.state = {hasError: false};
}
static getDerivedStateFromError(_: Error): ErrorBoundaryState { // 更新 state 使得下一次渲染能够显示降级后的 UI return {hasError: true} }
componentDidCatch(error: Error, errorInfo: React.ErrorInfo) { // 你同样可以将错误日志上报给服务器 console.error(Uncaught error:, error, errorInfo); }
render() { if (this.state.hasError) { return this.props.fallback; }
return this.props.children;
} }
相关的几次重构提交记录
增加高阶组件并应用在第一个小组件上
https://github.com/Jeff-Tian/weapp/commit/73937cd9b3c6f79d03ef66864616ccdc4df9854c
这是一个展示 GitHub 贡献的日历图,可以通过访问 https://taro.jefftian.dev/pages/subpages/about/github 查看在线示例,如下截图所示:

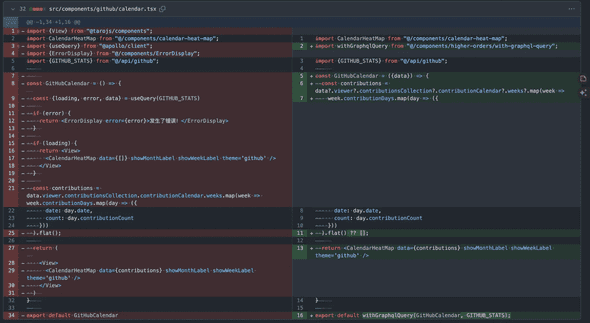
代码变更如下图所示:

删除了发送请求、对请求过程中、请求出错的处理代码,只保留了对数据做 map,并传递给 CalendarHeatMap 组件的代码。当然,虽然有代码删除,但是功能没有任何变化(所以是重构,重构的意思就是功能不变,仅仅只代码变了)。那么那些功能实现都在哪儿呢?从最后一行可以看出蹊跷。最后一行将原来组件使用 withGraphqlQuery 包装了一下,并传入了一个查询参数。是的,那些功能实现都挪到了 withGraphqlQuery 中去了,这个 withGraphqlQuery 就是一个高阶组件。
有了它,就可以在别的地方不停复用了。
应用在稍大一点的组件上
https://github.com/Jeff-Tian/weapp/commit/9129b71ee5631d0891cd7f185571332a59b1032a
这是一个 GitHub 贡献时间轴组件,同样可以通过 https://taro.jefftian.dev/pages/subpages/about/github 来访问,只是需要将页面滑到最下面查看,如下图:

应用于整个页面
https://github.com/Jeff-Tian/weapp/commit/285a747c2e0bd001d5d41953a90aa30a26a175de
通过应用于整个页面,瞬间给这个页面带来了骨架屏的效果。这一步算不上是重构了,因为之前没有做骨架屏的功能。但是由于为组件应用了高阶组件,而高阶组件又在数据加载中时,渲染一个空的组件,于是现在将页面代码一改,当数据加载中时,会看到空组件状态,而不是之前的“正在加载中……”这个简陋的实现了,算是意外得到的好处。
